Import Data
The Import Data feature enables you to import data into the application. This feature allows you to upload new records or update existing records in a convenient and efficient manner.
Note: This feature requires import permissions to allow access. Refer to permission for more details.
Import Details
Importing Employee Data & Bulk Invite Imported Employee (s)
Importing Other Forms
Note:
- Import Data in order. For example, an employee record needs information such as site, department, etc., though they are optional, but, if you plan to add them, then the information must be available on the application, so make sure to enter the details manually or import them so that you can avoid import errors.
- Some Imports can modify existing records.
- If your data normally resides in a different data format, you must first use your existing database software's File > Export or File > Save As function to translate the data to a .csv or .txt file.
- You must strip out all currency symbols, including (but not limited to) these examples: $, ¢, ¥, £, §, or ¤, if you are about to import them into a numeric field, such as Cost, List Price, etc. They are permissible in text fields.
- Commas, sometimes used as "thousands" separators, should be removed from numeric fields.
- Commas are permissible in text fields only when residing within a pair of double quotes, which will cause them to be treated as normal text, not as field delimiters.
Import Details
To import data:
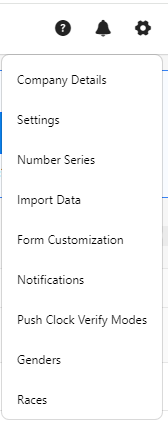
- Click on the gear “
 ” icon on the top right corner of the application.
- Click Import Data.
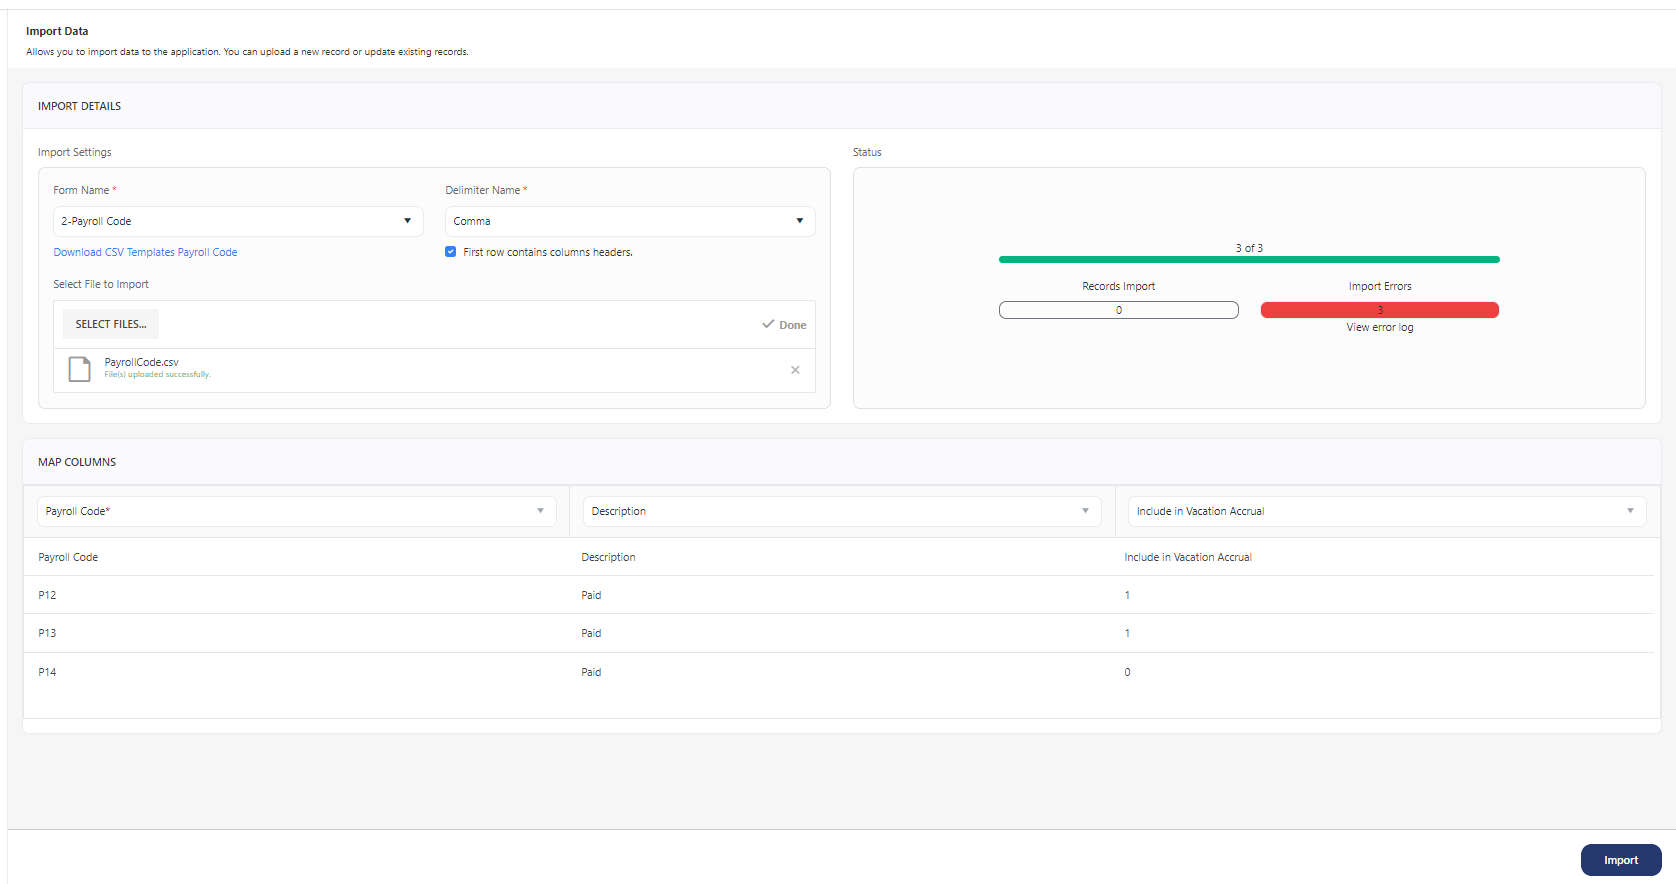
- Import Settings
- Form Name (Required) - Select the import form. The forms are the modules for which you will import the data to the application. The application allows importing site, department, absence code, payroll code, and employee data.
- Download CSV Templates - This is a link that appears once you select the form. It is a CSV file you can download and fill in the details. We recommend using this CSV file to import data.
Note that the acceptable choices for the columns containing fields requiring actions such as enabling/disabling, or selecting/deselecting specific functionalities include 'True' or 'False', 'Yes' or 'No', '1' or '0', 'y' or 'n', and 't' or 'f'.
- Delimiter Name (Required) - Select the file delimiters. Delimiters are the characters in the data file that separate fields and mark the end of records.
- First row contains column headers - Check this checkbox. It will automatically map the header from the CSV
- Select File to Import - Click on the Select Files button to upload the CSV file.

- Map Columns - This table will appear once you upload the CSV file.
- If the "First row contains column headers" is checked, you will notice that headers are automatically mapped.
Note: Make sure to verify that all the mandatory fields are filled. The mandatory fields have an asterisk (*) next to the header.
- Import Button
- The first-time users will see the Import button in disable mode. The button will enable only when you upload the CSV file. Refer to the screenshot attached below the Import Settings section.
- Once the import feature is used, the second time user onwards will see the New Import button (instead of the Import button). The button will be enabled and the Import settings will be disabled. To start the import activity and enable the import settings section, click on the New Import button.

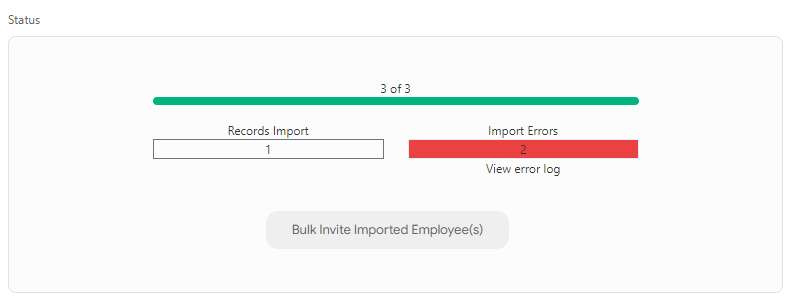
- Status - The first-time user will see "No import in Progress" whereas once you use the import feature, then it will display the status of your previous import.
Note: Whenever you perform a new import, you will see the status of your previous import. Please do not get confused by that status. It will update, once you click on Import or start the import process, the status will get replaced and will show the status of your current import activity.

- The progress bar displays the number of records imported.
- Records Import - Displays the number of records imported successfully.
- Import Errors - Displays the number of import errors.
- View Error Log - Display the errors.

- Note that the acceptable choices for the columns containing fields requiring actions such as enabling/disabling, or selecting/deselecting specific functionalities include 'True' or 'False', 'Yes' or 'No', '1' or '0', 'y' or 'n', and 't' or 'f'. The Import Error Log will also show this message.

- Bulk Invite Imported Employee (s) - The button will appear only when you import Employees. A minimum of one employee import should be successful for this button to appear (refer to the screenshot below, where only one employee is imported successfully). The related topic is Bulk Invitation > Sending Bulk Invitation.
Importing Employee Data & Bulk Invite Imported Employee (s)
- To import employee data, select "Employee" in the form name. Select the delimiter.
- Download the CSV template and fill in the information.
Few tips:
- Fill in all the mandatory fields.
- Add a work email if you want to give access to "Employee Will Access The Application".
- The acceptable choices for the columns containing fields requiring actions such as enabling/disabling, or selecting/deselecting specific functionalities include 'True' or 'False', 'Yes' or 'No', '1' or '0', 'y' or 'n', and 't' or 'f'. Example - "Employee Will Access The Application" can be yes or no. yes indicates the checkbox is checked, and no indicates unchecked.
- If you're designating a manager for an employee, please be aware that the employee might not appear on your "View Employee" screen unless you possess the authorization to see the employee from the manager's viewpoint using the "View this list As" feature. The related topic is the Add Employee > Manager section.
- Enter the clock user ID. ClockUserId is required for a user who clocks in and out using a physical clock. This field maps the punches to an employee. This field is not mandatory for an employee who only uses the web or mobile clock in/out feature (on the home screen).
- If you are importing a role and a valid email, and you do not import a value for "employee will access the application" then the "employee will access the application" checkbox will be automatically enabled.
- The "Employee" role is a default role. The role is not mandatory. If you are not adding a specific role, then on import, the employee will be assigned an "employee" role by default. If you are adding a new role other than the predefined roles, then make sure that the role is already available in the application. The related topic is Add Roles.
- Make sure that the lookups like site, department, race, gender, etc. are already available in the application (if you are planning to include the details in the CSV file).
- Make sure that the other built-in dropdown values, like marital status, type, etc. match. (if you are planning to include the details in the CSV file).
- The "Employee Approval" field is enabled only if "Employee Will Access The Application" is enabled. Make sure that you enable application access to give employee approval.
- Similarly, "Manager Approval" and "Required Only if Overtime" are dependent on the Manager field. The related topic is Timecard settings.
- If you want to make an employee/list of employees inactive, make sure to add "Inactive" in the status column.
- To view all employees (who have and do not have a manager), the logged-in employee should have View All Employees permission.
- The date of birth format is MM/DD/YYYY.

- Check "First row contains column headers" to map the header from the CSV.
- Select the file to import and upload the CSV file. The imported file name will appear below the Select Files button.
Note: Import will actually override the employee data, so make sure to double-check the employee IDs.

- Click Import.
- Check the Status to check if the import was successful or not. Check the error log if you see Import Errors.
- You will see the Bulk Invite Imported Employee(s) button if a minimum of one employee is imported successfully.
- Once the employee import is completed, you can click on the Bulk Invite Imported Employee(s) button and it will take you to the View Employee screen.
- The View Employee screen will be already filtered and will display the imported employees with the status "Not Invited". You can select all and click on the Invite button.
- You can only invite if the imported employee has application access, i.e. the "Employee Will Access The Application" enabled or set to yes.
- You will see all the employees only if you have the privilege to see employees from the topmost person in the organizational hierarchy. For Example - The "View this list as" is set to someone at the top like CEO or Admin. But if you are someone with fewer permissions, then you will only see the employees reporting to you on the View Employee screen.
Note: Records shown on the Employee grid are subject to strict permissions and it is entirely possible to import records and not see them - without modifying the permissions or filters on the employee list. This scenario also applies if a manager is assigned to an employee and he/she is logged in. Note that usually employees can only be seen by their own management chain, subject to permissions and filters.
Note: For Bulk invitations, one should have employee and employee-related module permissions like Employee, Employee - Application Access, View All Employees, etc.
Importing Other Forms
Sites / Departments
To Import sites or departments
- To import
- Sites, select "Site" in the form name.
- Departments, select "Department" in the form name.
- Payroll codes, Select "Payroll Code" in the form name.
- Absence codes, Select "Absence Code" in the form name
- Select the delimiter.
- Download the CSV template and fill in the information. Make sure to fill in the mandatory fields.
Note:
The acceptable choices for the following fields are:
- "Include in Vacation Accrual" in the Payroll Code are 'True' or 'False', '1' or '0', and 't' or 'f'.
- "Paid" and "Include in OT calculation" in the Absence Code are 'True' or 'False', 'Yes' or 'No', '1' or '0', 'y' or 'n', and 't' or 'f'
- Check "First row contains column headers" to map the header from the CSV. This step is optional.
- Select the file to import and upload the CSV file.
- The imported file name will appear below the Select Files button.
- The Map Column table appears with all the data filled from the CSV template.
- The header will map automatically if the "First row contains column headers" is checked.
- Click Import.
Example - Importing Site

Example - Importing Payroll Code
- Check the Status to see if the import was successful or not. Check the error log if you see Import Errors. If there are any errors, fix the errors.
